Pterygoid implants are a powerful tool in implant dentistry, particularly when treating patients with severe posterior maxillary atrophy or insufficient bone volume. The ability to anchor implants in the pterygoid region—a dense area of bone near the sphenoid bone—has allowed clinicians to restore function and aesthetics without the need for complex bone grafting or sinus lift procedures. However, placing pterygoid implants requires advanced techniques, careful planning, and precise execution.
In this step-by-step guide, we’ll walk you through the process of pterygoid implant placement, from initial assessment to postoperative care. This guide is designed for trained dentists who are familiar with implantology but wish to deepen their understanding of pterygoid implants and their application in challenging cases.
Step 1: Comprehensive Preoperative Evaluation
The success of pterygoid implant placement depends heavily on proper planning and patient selection. A comprehensive evaluation should be done to assess the suitability of pterygoid implants for the specific clinical case.
Key Elements of Preoperative Assessment:
- Clinical Evaluation:
- Review the patient’s medical history, particularly any conditions that may affect bone healing (e.g., diabetes, autoimmune disorders).
- Assess the general health of the oral cavity, including the condition of the soft tissues and the presence of any infections or inflammation.
- Evaluate the occlusion and ensure that the patient’s bite can accommodate implant-supported restorations.
- Imaging:
- CBCT (Cone Beam Computed Tomography) is essential for detailed 3D imaging of the maxillary anatomy. It provides accurate measurements of the available bone in the posterior maxilla, as well as critical anatomical structures like the sinus, neurovascular bundles, and the pterygoid plates.
- Measure the bone height and bone density in the posterior maxilla, especially around the pterygoid region, to determine the ideal implant length and size.
- Assess the angulation and the positioning of the pterygoid plate to determine the best approach for implant placement.
- Treatment Plan:
- Based on the CBCT scan, plan the number and placement of pterygoid implants. Typically, two implants are placed in the pterygoid region, often in combination with other implants in the anterior maxilla for full-arch restorations.
- Decide on the implant type (e.g., angled implants, short implants, wide-body implants) based on the available bone and the planned restoration.
Step 2: Anesthesia and Patient Positioning
For a comfortable and controlled surgical environment, it’s essential to choose the right anesthesia and patient positioning.
- Anesthesia:
- Local anesthesia is generally sufficient for pterygoid implant placement. A combination of lidocaine and epinephrine can be used for both local anesthesia and hemostasis.
- In cases of anxious or uncooperative patients, conscious sedation or general anesthesia may be indicated, especially if multiple implants or complex procedures are involved.
- Patient Positioning:
- Position the patient supine (lying on their back) with the head slightly tilted back and the chin elevated. This position provides optimal access to the posterior maxilla and ensures good visualization during the procedure.
- Proper positioning of the head and neck minimizes the risk of complications during surgery and provides a stable working environment for the dentist.
Step 3: Incision and Flap Design
Creating a proper surgical flap is essential to gain adequate access to the pterygoid region and place the implant with precision.
- Incision Placement:
- A buccal mucosal incision is typically made near the second molar area of the upper arch.
- The incision should be designed to preserve the attached gingiva and avoid damage to the buccal sulcus or mental nerve.
- In some cases, a vertical releasing incision may be necessary to achieve better access to the pterygoid area.
- Flap Reflection:
- Reflect the mucoperiosteal flap to expose the underlying bone. Care should be taken not to damage the underlying soft tissues, such as the periodontal ligament and vascular structures.
Step 4: Bone Preparation and Implant Site Creation
Once the flap is reflected, the next step involves carefully preparing the bone site for implant placement.
- Marking the Implant Position:
- Using the preoperative CBCT data, identify the ideal location for the pterygoid implant in relation to the pterygoid plate and the sinus cavity.
- Typically, pterygoid implants are placed at an angulation of 30–45 degrees to the occlusal plane, directed toward the pterygoid process.
- Pilot Hole Drilling:
- Start by drilling a pilot hole in the posterior maxilla, aiming at the pterygoid plate. Begin with a small, low-speed drill to ensure you are in the correct location.
- It’s crucial to drill at the correct angulation to avoid damaging the sinus membrane or vital structures.
- Sequential Drilling:
- Gradually increase the drill size to prepare the site for the final implant diameter. Use progressively larger drills to ensure that the implant will fit snugly and securely in the bone.
- Throughout this process, constantly irrigate the surgical site with saline to minimize heat buildup and ensure the bone remains hydrated.
Step 5: Implant Placement
With the implant site prepared, it’s time to place the pterygoid implant(s).
- Implant Insertion:
- Using a torque wrench, carefully place the implant into the prepared site, ensuring that it is inserted at the planned angulation. Pterygoid implants are often angled to engage the dense bone of the pterygoid plate while avoiding the sinus and vital structures.
- The implant should be placed with primary stability, meaning it should be firm enough to support the restoration immediately or after a short healing period.
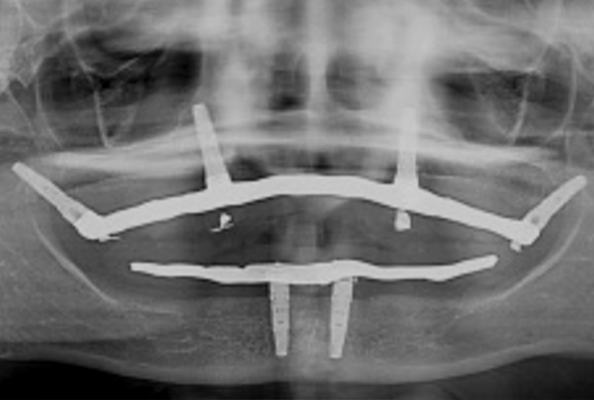
- Verification:
- After placement, verify the position of the implant using radiographs or CBCT to ensure that it is placed in the correct orientation and engages the pterygoid bone properly.
Step 6: Soft Tissue Closure
Once the implants are successfully placed, it’s time to close the flap.
- Flap Closure:
- The mucoperiosteal flap should be sutured back into place, ensuring that there is no tension on the soft tissues. Use resorbable sutures to close the incision and secure the flap.
- Avoid placing sutures too tightly, as this may compromise blood flow to the implant site and delay healing.
- Postoperative Instructions:
- Provide the patient with instructions on oral hygiene, post-surgical care, and any medications (such as antibiotics and analgesics) to prevent infection and manage pain.
- Patients should be advised to avoid applying excessive pressure to the surgical site, especially in the first few weeks.
Step 7: Postoperative Care and Monitoring
Postoperative care is critical to the success of pterygoid implants and ensuring proper osseointegration.
- Follow-Up Appointments:
- Schedule follow-up appointments at 1 week, 1 month, and 3 months to monitor healing and check for any complications, such as infection or implant failure.
- At each visit, assess the soft tissues around the implant, ensuring that the flap has healed without any signs of infection.
- Osseointegration Monitoring:
- Radiographic evaluation at 3 months will provide insight into the osseointegration At this stage, the implant should be stable and well-integrated into the surrounding bone.
- Restoration Planning:
- Once osseointegration is complete, the final restoration (e.g., a bridge or fixed prosthesis) can be planned and placed on the pterygoid implants.
- Depending on the clinical situation, immediate loading may be considered if the implant shows adequate primary stability.
Conclusion: Mastering Pterygoid Implant Placement
Pterygoid implant placement is a specialized technique that provides implantologists with a reliable solution for restoring the posterior maxilla in cases of severe bone atrophy. With proper case selection, imaging, and execution, this approach eliminates the need for sinus lifts or extensive grafting and allows for full-arch rehabilitation using native bone structures.
For experienced clinicians, mastering this procedure not only expands the range of treatment options but also improves patient outcomes in anatomically compromised cases. By incorporating pterygoid implants into your surgical skill set, you can elevate your practice and offer life-changing solutions to patients who were once considered untreatable.